Monday, December 19, 2016

DIY Holiday Wreaths

This weekend we made our own holiday / Christmas wreaths!  I've never made a wreath before but was chatting about it with a friend and it sounded so fun and easy.  And, well, it was!!  After breakfast on Sunday, Bryan and I hopped on our bikes and embarked on a little foraging adventure around the neighborhood.  It was fun to cruise around with no real destination or purpose other than exploring the streets around where we live and clipping off the occasional straggler branch from wreath-resembling trees and bushes.

We got home and unloaded our loot onto the concrete table (with a tablecloth, of course... I'm a bit protective of the thing as I'm sure you can imagine).  I managed to find a couple of wire wreath forms in the craft closet, leftover from our succulent wreath days... okay, so I guess I have made my own wreath, but the technique and result was totally different >.<


The clippings we collected included redwood, ponderosa pine, coyote brush, pepper tree (complete with little red peppercorns), a couple types of juniper, and a handful of others that I don't know the names for.  If you want to make a wreath, don't worry about looking for specific plants.  I was worried that our wreaths wouldn't look Christmas-y without lots of pine, but it turned out that all of the different branches added their own fun texture and color to the mix.  There's really no going wrong.  Here is Marta with her awesome peppercorn wreath, and Alena's wreath which features almost all of the different clippings I collected, plus some red berries!


I also discovered that certain techniques worked better than others for actually creating the wreath.  I started off by trying to tie the branches onto the wreath form with floral wire, but this was very slow-going and wasn't doing much for me.  Instead of tying on each individual branch, I started weaving the branches through the wire form (see in the first photo how there are 4 metal circles connected at a couple points around the circumference).  This seemed to work really well and everything held in place.  Once you have a good base of greenery, then you can get into the fun part of sticking in more textured branches, berries, and anything else your heart desires!  Here's everyone with their finished wreaths on the staircase:


Overall this was a super fun project, and cost nothing!  Even if you don't have the wreath forms lying around, I'm pretty sure they cost something like $5 from Michael's.  I would love to keep this project going and make wreaths from other materials (eucalyptus, lavender, etc!) that I can display all year round.  But for now, Merry Christmas :)


Sunday, December 4, 2016

Concrete Table

Okay... this was a freaking epic project!!!!!  And I am incredibly happy to say that it's finally DONE.  After 3 full weekends and a couple long nights at woodworking class, we have a beautiful concrete dining table that looks so awesome in our new house.


It all started when we moved in, and I had a dream to build us a dining table that fit our space perfectly.  At first I wanted a rectangle farmhouse-style table, which I figured would be pretty easy to do in wood shop.  But then when we moved in, we felt like there were already a lot of square/rectangle shapes going on in the house, so my friend Emily had the fantastic idea to do a round table instead.  I'm not sure how I didn't think of this to begin with, since I love round tables!  You can fit more people around them in a smaller space, and no one ever feels like they are stuck on the end.

So it was decided - round table.  Then I started thinking about making this out of wood, but I couldn't find anything I liked after a few hours of searching Pinterest.  Instead, I found this.  Yes, you read that right.  $2,500 for a table.  I had already mentally prepared myself to build a table out of wood, so how much harder could it be to make the top with concrete??  Challenge accepted!

I knew that the first thing I needed to do was make a mold for the tabletop.  This was a bit of a wild goose chase, but in the end I decided that a big peice of melamine would be the way to go for the main surface.  Once I figured out how to cut a perfect circle, I would use rubber molding (like the kind used for landscaping) around the edge to finish the mold.

Bryan and I made our way to Home Depot to buy the melamine.  First I couldn't find a peice big enough for the 4 ft diameter tabletop.  Finally I found a peice, but it was HUGE!  Like 4 ft by 6 ft.  And I have a tiny car... VW Golf... 2 door!  We dragged it over to the big saw in the back, and searched the store for someone to help us cut it in two.  We finally found a guy, but then he said that they couldn't use the saw to cut that type of material... great.  He pointed us over to the hand-cutting station, where Bryan and I broke a sweat using a hand saw to cut this humongous thing in half.  Yeesh.  We were pretty exhausted by the time we finally got through it, but we were excited to be done so we paid for it and headed out to the car!  Only to find that it STILL didn't fit in the car.  Lol!!  So I bought my first-ever roof straps - problem solved :)


After one day of sketchily driving to work and climbing in and out of the driver's side window (since the doors were strapped shut), I made it to wood shop and it was time to figure out how to cut a perfectly round circle out of wood.  My awesome teacher helped me build this jerry-rigged compass out of a nail, a skinny piece of wood, and a jigsaw.


We taped and clamped the jig saw to the long peice of wood, then measured 24" from the saw blade (half the 48" diameter I wanted) and hammered a nail through the compass and into the melamine.  It actually worked incredibly well!  I had a perfect circle in no time.  I knew I wanted a couple test peices for the concrete pouring, so I used the compass again (shortened) to make two smaller circles, one of which I cut in half, since I had extra melamine.  Why not?!

After I had my perfect circle, plus a smaller perfect circle and two perfect half circles, I started thinking about making the mold and pouring the concrete.  I kept getting stuck on how thick it would be, how much it would weigh, whether I would need to put rebar or some sort of wire reinforcement in the middle... and it was a lot to think about, so I started searching for some other options.  I stumbled across 
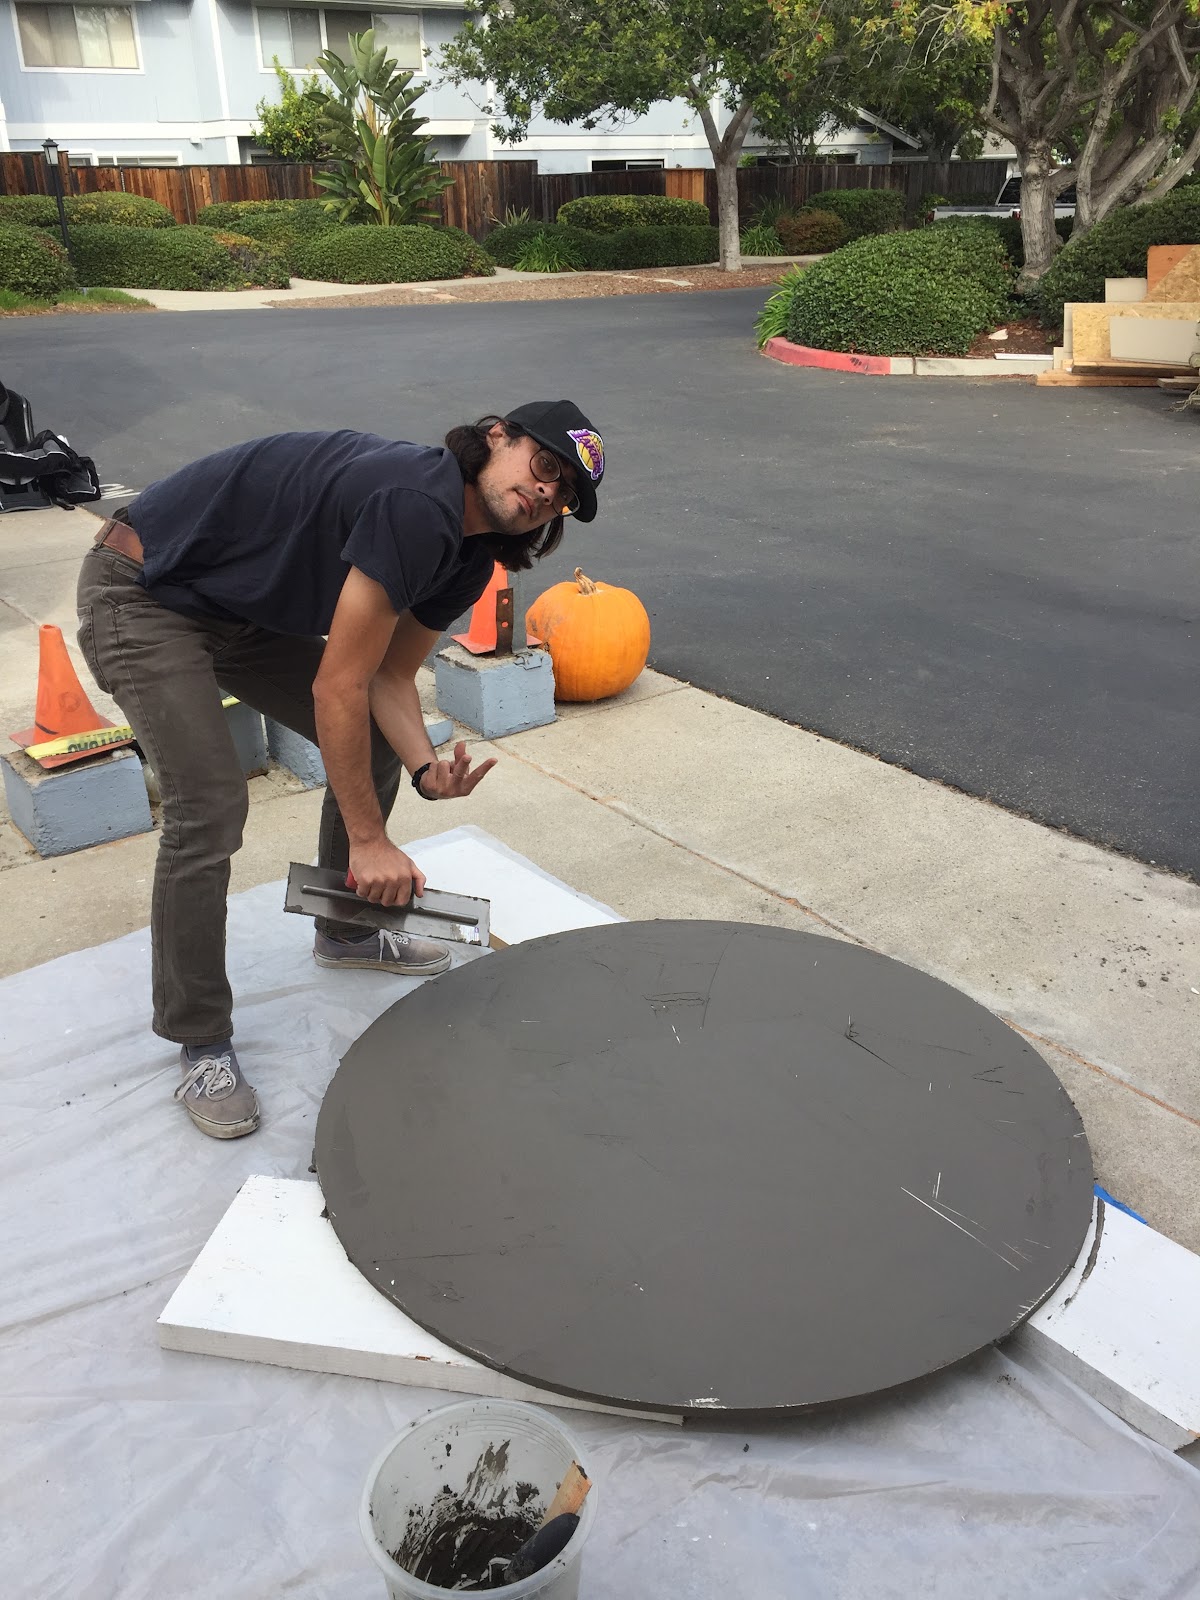
this awesome post on the Home Depot blog.  Instead of pouring a top that would be something like 500 pounds and might break someone's knee cap during an otherwise wonderful dinner party, coating the outside of the table with concrete seemed like a really great idea!  So that's what I did.  Andrea's instructions were awesome, except that the whole process took WAY longer than she describes on the blog.  It was a bit faster on the warmer days, but still took a while for each layer to dry.  Here's Bryan smoothing on the first layer of concrete and modeling his cool safety gear:


A couple tips for the concrete top - when mixing the concrete, pour the water before adding the concrete.  It mixes a lot easier!  Also, as soon as you are done smoothing a layer, fill the bucket with water and put your tools in there too, to avoid some hardcore scraping to clean everything off later.  We ended up doing 4 layers on everything.  This made for nice rounded corners and a relatively smooth look on top.  Check out the beautiful cones and dumpster in front of our house... can't wait for this construction to be over!!


For the base, I found this super thorough and helpful blog post which I followed almost exactly.  Just make sure to check for square on all the corners (mine are far from perfect, but look fine), and use trigger clamps to keep everything in place before screwing!  Overall this base was incredibly easy and came together really quick.  It looks awesome too.  Even if you don't have a saw at home, you could measure everything out really carefully and have them cut it for you at the store.


Last but not least, we screwed the top to the base, and sealed the top with the food-safe countertop sealant recommended on the Home Depot blog post.  I was a little disappointed with this final step, since the tiny bottle of sealant was $75 and it actually DID change the color of the table, even though the blog said it wouldn't.  But, luckily, I am happy with the color since the slightly darker grey actually looks better in contrast with our light grey walls.  But be forewarned!!!  We will probably seal the smaller tables with a cheaper concrete sealant since we don't need those to be food safe.  TBD.  See what the top looked like before sealing:


After all that, we cleaned up the space and got to start enjoying our new table.  Here is the finished product!  I am in love!!  Pay no attention to the shims under the feet... that will be a quick fix :)


Below are the materials I used and their costs (minus the things I think everyone would have around the house).  Some of the stuff I already had, and a lot of the tools I used in wood shop so I didn't have to buy.  I bolded the prices for things that I did have to buy, so that I could add it all up and prove to Bryan that it was still a bargain for an uber cool and beautiful table :)

Materials for both the top and the base:
  • Disposable cups for stain, measuring concrete, etc / Around the house
  • Tape measure / Around the house
  • Safety glasses / $4
  • Dust mask / $5 for a box
  • Orbital Sander / $30 
Materials for the top:
  • Melamine or other big piece of wood / $35
  • Roof straps.. optional if you have a nice big truck! / $10
  • Nail & duct tape for making compass / Around the house
  • Jigsaw / $25
  • Feather Finish Concrete / $17 each (x3) // $51
  • Big concrete float or trowel / $13
  • Little concrete scraper / $6
  • Bucket / $3
  • Stirring stick(s) / Free
  • Sponge / $2
  • Sealant / $75 (ouch!)
Materials for the base:

  • 8ft 4x4 Douglas Fir / $8.35 each (x2) // $17
  • 8ft 1x10 Premium Pine / $15
  • Handful of 3 inch and 2 inch screws / around the house
  • Drill / you should have this :) if you don't you can buy one for ~$100
  • Trigger Clamps / $30 for a set of 4
  • Wood glue / $3
  • Kreg Jig / $40-$100 depending on what you want out of it
  • Miter saw / Cheapest one at Home Depot is $100
  • Table saw (only if you're cheap like me and buy the pine that needs ripping) / Cheapest one at Home Depot is $150 so just buy wood that's the right width...
  • Paint brush / around the house
  • Paint thinner (to clean brushes) / $7
  • Stain - I used a pint of Watco Danish Oil in Dark Walnut / $10
So overall it cost me $277 to make an awesome 4 ft round concrete dining table, plus tabletops for a 2 ft round coffee table and two half-circle bedside tables!!  I'd also like to point out that even if I bought ALL the tools and paid myself minimum wage (because, let's be honest, I am not a skilled construction worker) for the ~30 hours I spent on this project, the whole thing would still cost less than half of that Restoration Hardware table.  So, yay!

Wednesday, November 30, 2016

It's CHRISTMAS!!!!!

And that means, time for Christmas decor!  Check out the updated version of the wreath-pallet.  Exciting post about my concrete table coming this weekend...


Tuesday, October 25, 2016

Seasonal Decor

I've always loved decorating for the holidays, but I am the opposite of a hoarder and can't stand having boxes and boxes of stuff that only gets used for a month out of the year!  So when we moved into our new place I immediately started thinking about what we could do that would be cute all year but that we could modify based on different holidays.

We were at Lumber Liquidators with a few friends and the gal there told us that we could take whatever old pallets we wanted from the back of the store.  After a little dumpster diving, Bryan found the most awesome pallet ever that turned into my new favorite piece of home decor!!  I screwed in a little metal hook, found a summer-y wreath at HomeGoods, and voila!  I'm basically Joanna Gaines.  Kidding... but really she's my idol :)


Anyway, back to my original point, I love this thing because I can change out the wreath to match the seasons!  More recently I started my quest for the fall rotation.  I discovered this new store in Oxnard called Kirkland's, where I found a nice simple wreath for about $10.  I didn't like all the more extravagant ones they had there and at Michael's - they just looked too fake with all the sunflowers, glitter, etc.  So I bought the boring wreath and spiced it up with a couple cute little fall accessories that I found in the Michael's discount bin.  Love it!  


And, of course, Christmas is coming soon so that one is going to be a bit more obvious.  The possibilities are endless!

Tuesday, September 20, 2016

The life of an interior decorator

is HARD!!  Almost 5 months since we bought our condo, most of our walls remain bare and it seems like we have more empty rooms than full ones... but we're loving it anyway :)  We made some progress a couple weeks ago and managed to frame some home-grown succulent photos, resulting in my favorite corner of the house so far!  Observe:


I've decided to start blogging again so I can chronicle our multitude of upcoming projects... including a new entryway bench built by yours truly in woodshop class, a newly landscaped garden, once our exterior walls are done being destroyed (thank you, HOA), and way off in the distance an amazing craft room!!!  My forever dream come true!  Stay tuned...

Friday, June 26, 2015

Stitch Fix #2

Okay, that was fast I know!! A bunch of my coworkers found the idea of Stitch Fix really fun, so I already got my first $25 for a referral :)  I figured, what's the harm in trying it again if I can do the whole thing for "free" ??  Well I think the harm is that this is way too fun and way too expensive... so hopefully this will be my last one for the foreseeable future!

I was pretty happy with my stylist last time with the exception of the skirt, so I didn't change anything except for adding a comment that I would be going to Hawaii shortly after receiving this Fix, so fun summery things are at the top of my list.  So here we go again!

Jill Michael Brookside Coin Necklace $38
This is cute but just a little too plain and also too shiny to be super chic.  And too expensive for something I feel just "meh" about.

Le Sample Kahlo Embroidered Racerback Tank $38
Dear John Lillie Cuffed Short $58
Right out of the box I really liked both of these items, but I thought that the shorts might be a little too big and sadly I was right.  I think they would be perfect if they were just one size smaller but now that I know I want shorts like this I can probably find them for cheaper online somewhere else... sorry Stitch Fix but a girl's gotta save!!  The top is cute, and I tried it on with another pair of pants since I won't be keeping the shorts.  I like it!  The mix of the stripes and the stitching detail is fun, and something I don't really have in the rest of my wardrobe.  Still deciding if I want to keep it or not.

Skies are Blue Sunbury Crochet Detail Top $44
I love this one!!  I was a big fan of the little white ball things right when I saw them, and when I put it on they make me look a little bit tan which is always good!  My stylist has this whole thing about adding prints into my closet pretty dialed :)  This one is a definite keep.

Collective Concepts Marci Dress $78
Okay first of all, look at that price tag!  Youch!!  This dress kills me because I love the color and the print, plus the length is nice for work and general life activities where I don't want my bum on display.  The only thing I don't really like about it is the v-neck (I'm more of a scoop neck kinda gal) and the fact that I know I could get something with a similar feel at Target for half the price...  Check out the cute straps and everything too!  Sadly I don't think I can talk myself into this one... it's gotta go back... wah.  Sad.

So there's my fix!  It was, once again, super fun and also caused lots of inner turmoil about money and decision making... always exciting :)  Let me know what you think of everything, and use my referral link below if you want to try out the service!  Except maybe not because then I'll be tempted to do this again... ha!

Tuesday, June 16, 2015

Stitch Fix: Update!

Exciting turn of events (ha!)... I ended up keeping everything in my fix!  I tested out the blue tank top in the real world and loved it, so I was definitely going to keep that and the white lace tank.  I was not super enthused about the teal t-shirt and the gold bracelet, but then when a coworker offered to buy the maxi skirt which was more her style, I figured what the heck!  Plus the 25% discount gives me all four items for just a little more than I would have paid for the two tops... overall, great success :)

Don't forget to use my referral link in the post below if you want to try Stitch Fix for yourself!